IPv6, Secure and Private AI are both upon us, and Cohesive Networks is delivering into those areas with the same practical approach we have used for Public and Private Cloud all these years.
Moving to IPv6 – herein lies madness (Part 1)
read more

Image courtesy of wireguard.com.
WireGuard® is a new communication protocol that implements encrypted virtual private networks (VPN). It endeavors to provide network agility, advanced security, performance, and configuration simplicity. Back in 2017 Jason A. Donenfeld, a security researcher and Linux kernel developer, was looking for a stealthy traffic tunneling solution for use in penetration testing jobs. In an interview on the Security. Cryptography. Whatever. podcast, Donenfeld explains that while he was “familiar with OpenVPN and IPSec” he was well aware of the bugs these solutions carried with them. Thus, he set out to create something new for himself that would not suffer from historical technical debt.
IPSec, one of the major VPN options available today, was born in 1992 with the Internet Engineering Task Force’s formation of the IP Security Working group, and was standardized in 1995 under RFC-1825 and RFC-1827. IPSec has always required a tremendous amount of configuration unique to the hardware and software environments it will then connect. The encryption, key exchange, and authentication algorithms that it supports are overly broad, in order to support legacy equipment. The key exchange mechanism can be prone to rekeying issues, causing stability problems. This is not to say that IPSec should be avoided, but to point to the non-triviality of its implementation. If you consider using IPSec as a vehicle for remote worker VPN connections (“people VPN” or “road warrior VPN”), there are security concerns as simple as an “aggressive mode” sending a hash of pre-shared keys in plain text.
Another option, OpenVPN, was initially released in 2001 by James Yonan. It uses Secure Socket Layer (SSL) and Transport Layer Security (TLS) to provide encryption. OpenVPN is currently the most widely used VPN protocol on the planet, to the extent that some might consider it the backbone of modern online security. Along with trusted encryption, OpenVPN also supports a wide range of algorithms for encryption and authentication, hashing, and key derivation, making it highly adaptable to different deployments. It also uses certificates for identification and encryption and it can operate on UDP or TCP.
This brings us back to the steady emergence of WireGuard. In January of 2020 Linus Torvalds merged David Miller’s “net-next” tree into the Linux kernel, bringing WireGuard into the mainline Linux kernel tree. WireGuard was written to be efficient and easily readable; it is comprised of around 4,000 lines of code, which is much fewer lines of code than OpenVPN relies on. Among other benefits, this smaller size makes WireGuard auditable in an afternoon (or so) and the condensed code significantly reduces the attack surface. The goal is to keep WireGuard slimmed down to its basic operational function; a simplified and performant VPN. It is left to third parties to extend it to meet various functional business requirements.
While IPSec and OpenVPN provide a plethora of algorithmic options, WireGuard limits the need for user choice and customization in favor of fast, modern cryptographic primitives that don’t rely on hardware accelerators. This greatly removes the possibility of user miscalculation and thus insecure or improper deployments. Many connectivity vulnerabilities are caused by the combination of primitives, not always the primitives themselves. WireGuard endeavors to combine known, secure, and performant primitives, and allows you to negotiate protocol versions to easily address future vulnerabilities.
WireGuard operates much like OpenSSH in terms of public and private keys. Peers identify themselves with a unique public keys which are is used to establish their IP inside of the tunnel. WireGuard calls this concept “cryptokey routing”. This simplification of tunnel configuration is a major advantage of WireGuard. Performance is another major factor of WireGuard’s appeal. OpenVPN adds about 20% data overhead while IPSec adds around 10%, but WireGuard uses a mere 4% more data than an unencrypted connection. Most tests even show WireGuard performing around twice as fast as OpenVPN, with WireGuard operating near to or close to line speed. Another key factor to the speed of connectivity is where WireGuard operates in the operating system. On Linux, WireGuard operates in kernel space, where packets are processed at a much faster rate. However, on Windows this is not the case, so the WireGuard group has developed a very simple and minimal TUN driver, Wintun, for the Windows kernel that shuttles packets to the Windows User Space. We can probably expect WireGuardNT (LINK) to move into the Windows kernel space in the future.
Back to the cryptokey routing table. The “cryptokey routing” concept developed by WireGuard allows changes to external source IPs to be picked up and propagated quickly and efficiency. Whether you are a roaming client that is switching between cellular and wifi, or a client that needs to ‘fail over’ to a backup server, the cryptokey routing table gets updated in mere seconds with the new IPs of the tunnel. In comparison, OpenVPN can take 30 seconds to reestablish new IP connections, which is only slightly slower than the time it takes IPSec connections using BGP routing to reestablish similar connections. The WireGuard protocol provides additional security in that it does not respond to packets from non peers nor unauthenticated packets, leaving WireGuard mostly invisible to non-peers.
In conclusion, it appears WireGuard aims to keep its code base small, be easy to implement and audit, all while having blazingly fast performance using state-of-the-art cryptography.
“WireGuard” and the “WireGuard” logo are registered trademarks of Jason A. Donenfeld.

As cloud adoption continues to ramp up in 2022, with Gartner projecting another 21.7% growth in cloud spend this year, companies are maturing beyond their initial workload migrations to single cloud vendors. Whether to create resiliency due to the now not so uncommon major outages we have seen in the past few years, to tailor their many application environments to changing business requirements, or to migrate to new cloud vendors whose offering is the best fit. However, in order to realize these opportunities, companies need a consistent network layer that is uncoupled from any one cloud vendors specific dependancies. No matter which cloud you choose, achieving this goal requires utilizing third party network solutions. Such a solution should ideally facilitate connectivity to data-centers, remote users, and IOT devices as well.

Cohesive Networks VNS3 cloud edge security controllers can create the backbone across all of your public cloud vendors in an easy to manage and secure mesh, with LNKe connecting all of your virtual private networks. This gives you a fully transitive network across all of your cloud real estate, running at performative speeds with built in failover and self healing mesh capabilities. Granular IPSec cloud edge configurations allow you to connect corporate data centers, partner networks and vendor access, regardless of their hardware. Policy enforcement is consistent across the network and has been simplified for ease of management. With our comprehensive firewall you can easily define people, groups and network objects to allow your remote workforce to securely connect at the edge closest to their physical location. In short, with VNS3 and LNKe, you can create a full network mesh consistent with your needs that can grow to anywhere that you need to be and scale with your deploments.
Please reach out to the Cohesive Networks sales and solutions team at contactme@www.cohesive.net to further the discussion with any interests that you may have. We are always happy to help.

Internet Protocol Security (IPSec) is used to encrypt communications between two computers over the internet. Usually it is done between between security gateways to allow two networks to communicate securely. On the data center side this will be done for the most part on physical boxes manufactured by the likes of Cisco, Juniper, Fortinet and others. In the public cloud it is virtualized. Cohesive Networks VNS3 is one such device that allows you to easily configure these secure connections into your cloud private network. Whether you are running a hybrid cloud, are an ISV that needs to connect to customer sites or are implementing a multi cloud strategy VNS3 can provide a stable, secure and simple solution.
VNS3 can manage as many IPSec connections as you need, the only limit is the underlying instance resources. You can scale your VNS3 instance with the number of connections. It supports both policy and route based connections and supports a wide range of algorithms, hashes and Diffie-Hellman groups. In short, VNS3 can connect to just about anything out there. It’s highly configurable design lets you match exactly what it is communicating with. This all makes VNS3 a very stable solution.
Setting up VNS3 is a breeze. You can launch it out of your cloud vendor’s marketplace and pay by the hour, or contact Cohesive Networks for longer term billing. VNS3 should be placed into a public subnet. Once launched you will need to either in AWS, turn off source destination checking, or in Azure, enable IP Forwarding on its network interface. In AWS you should attach an Elastic IP (EIP) to it or in Azure a Public IP Address. Once it is up you can manage it via its web interface. You will need to open up TCP port 8000 in your security group. Then open a browser and go to:
https://
The default admin username is: vnscubed
In AWS the default password is the instance id, in Azure the default password will be the virtual machine name followed by a hyphen then the private ip (ex. MyVNS3-10.0.0.1)
Once you have logged in you should change the admin and api passwords.
The IPSec configuration page can be found under the Connections section on the left hand side contextual menu. From there you will want to click on the “New Endpoint” button and will see the IPSec configuration form.

Now it is just a matter of filling in the parameters for the endpoint you will communicate with. Typically you and the other party will agree upon a set of algorithms, hashes and dh groups as well as NAT-T or native IPSec and IKEv1 or IKEV2. While VNS3 does a good job of auto discovery it is best to make sure that both sides are explicitly the same. We provide a simple syntax for VNS3. An example might look like:
phase1=aes256-sha2_256-dh14
phase2=aes256-sha2_256
pfsgroup=dh14
phase1-lifetime=3600s
phase2-lifetime=28800s
dpdaction=restart
dpddelay=30s
dpdtimeout=90s
VNS3 simplifies this process by putting all of your configuration on a single page.
If you are creating a policy based IPSec connection you will next need to create individual tunnels for your connection. This is done after the creation of the initial endpoint. After the endpoint is created you can create a “New tunnel” from the action drop down to the right of your endpoint. This will be your local subnet and then the subnet on the other side of the connection that you will be communicating with.

With route based IPSec we support both Virtual Tunnel Interface (VTI) and over GRE, useful for sending multicast packets. If you are utilizing a VTI route based IPSec VPN you next want to set up a “New eBGP Peer” from the action drop down.

Your IPSec configuration should now show as connected.
In the next parts in this blog series we will dive into the tools we provide to troubleshoot a faulty connection, interesting things you can do with our firewall to transform the tunnel traffic, and some plugins we use to solve common problems.
In the same vein of recent technical blog posts, this week we’ll take a look at networking protocols.
Read up on:
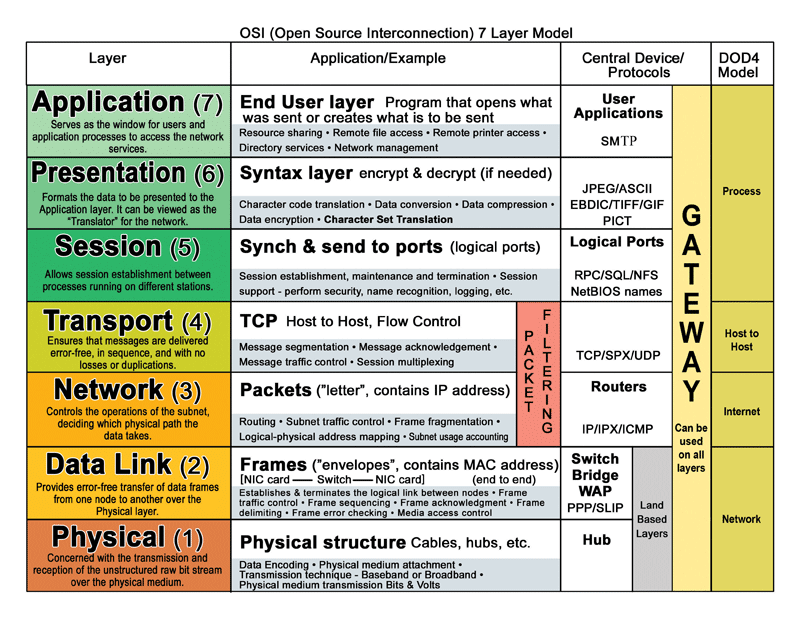
You’ll remember from the OSI/TCP networking layer posts , protocols live at the Transport Layer (Layer 4 in OSI).In layer 3-4, the Network and Transport Layers, routers do packet filtering.
Routers direct packets to the “street address” on the packet header “envelope” to make sure it gets delivered to the correct location. The transport layer functions ensure messages are received error free, in full, in order, and without duplicates.
Watch how common protocols can help you navigate cloud networks:
Tunneling protocols:
Internet Protocol Security (IPsec):
Transport Control Protocol (TCP):
User Datagram Protocol (UDP):
Transport Layer Security (TLS) & Secure Sockets Layer (SSL):
Secure Shell (SSH):
Border Gateway Protocol (BGP):
Generic Routing Encapsulation (GRE)

Part 2 of firewall rules with VNS3
Check out part 1 for all the overview parts.
Quick review:
VNS3 Firewall features are controlled using IPTables syntax. For more information see http://linux.die.net/man/8/iptables and look for the PARAMETERS section. Another useful guide is available here: http:// www.thegeekstuff.com/2011/06/iptables-rules-examples/
The order of rules matter.
If your customer rules don’t reject a packet, it will be allowed by default. However, this “default” is fairly restrictive. Traffic is allowed from “known” VLANS. Known VLANs are VLANS that are listed in IPSec tunnel rules, and the VNS3 virtual VLAN. Allowing traffic from other sources requires adding firewall rules to accept that traffic.
NATing:
Network address translator (NAT) can act as an intermediary agent on behalf of clients. The real originating IP address might be masked from the server receiving a request. A common practice is to have a NAT mask a large number of devices in a private network. Only the “outside” interface(s) of the NAT needs to have an Internet-routable address.
Most public clouds now provide VLAN isolation, a critical element of the defense in depth security approach. VLAN isolation also creates the need for additional capabilities beyond the basic compute and networking functions for application owners.
“NATing” allows the machines in a VLAN to use the VNS3 Controller as a gateway to services on the Internet, with all VLAN machines sharing the Controller’s public IP address.
NATing in public cloud uses the same behavior used in your home or office, where many devices can access the Internet via one shared public IP address. When a VLAN device accesses the Internet, its return traffic is routed to it.
Basically, VNS3 lets you use your cloud VLAN just like you treat your home or office network, isolated from inbound requests for service, but allowing most outbound service requests.
Simple Syntax
MACRO_CUST -o eth0 -s 172.31.1.0/24 -j MASQUERADE
In this example your VNS3 Controller is in a VLAN subnet with a network from 172.31.1.0-172.31.1.255. Many clouds with VLAN capabilities map a public IP to the private IP on eth0 via DNS.
Here we are telling the VNS3 Controller to “masquerade” for traffic coming from that subnet out to the Internet and then return the response packets to the requesting machine.

With AWS VPC, your can configure your cloud servers to not be visible and accessible from the Internet. AWS assigns a standard, automatically-assigned public IP , but we do not recommend relying on the automatic IP because you will not retain the same IP address if you shut down the instance. Rather, you should assign an Elastic IP to put the server on the Internet.
What if you want to be able to access one of the machines (for example like you might do on your home network) from the Internet? This is where port forwarding comes in.
A common use case would be using a Windows Remote Desktop on one of your cloud servers, as the “jump” box for then remoting to all the other cloud servers in your VPC. VNS3 lets you do this with your VPC, just like you could for your home or office network, allowing specific traffic, from a specific source, on a specific port to be “forwarded” on to another machine.
Simple Syntax
MACRO_CUST -o eth0 -s 10.199.1.0/24 -j MASQUERADE
Using the same example network, assuming a source network public IP of 69.69.70.70 from which the RDP client is running, do the following:
Netmapping allows you to create IPsec tunnels to imaginary IPs on the VNS3 side of the connection and use the VNS3 firewall to map all traffic to/from the imaginary IP, to the actual host on your cloud side. This is extremely useful in situations where a connecting party has an address overlap with your Overlay or VLAN subnet.
Example
Remote subnet 10.10.10.0/24
Local Server the Remote wants to access: 172.31.10.50
Customer will not connect their LAN (10.10.10.0/24) to a private network Allocate an EIP to your account but DON’T associate: 23.23.23.23.
Build an IPsec the tunnel from 23.23.23.23/32 to 10.10.10.0/24
Simple Syntax:
PREROUTING_CUST -i eth0 -s 10.10.10.0/24 -d 23.23.23.23/32 -j NETMAP –to 172.31.10.50/32
POSTROUTING_CUST -o eth0 -s 172.31.10.50/32 -d 10.10.10.0/24 -j NETMAP –to 23.23.23.23/32
If the Local Subnet is a VLAN and not the Overlay Subnet add the following forward rule:
FORWARD_CUST -j ACCEPT
With the addition of the Docker-powered application container system there are scenarios where you might want to push a copy of the traffic from the eth0 or tun0 VNS3 interface to a particular IP. The obvious use-case is copying traffic to the Cohesive Utilities Container where you can do things like run tcpdump or iftop.
Example:
I want to copy all tun0 (Overlay Network) traffic to my Network Utils Container running on the VNS3 Controller on the Docker network at 172.0.10.2.
Simple Syntax:
MACRO_CUST -j COPY —from tun0 —to 172.0.10.2 —bidirectional
VNS3 now supports a number of industry standard MIBs for use from monitoring system doing SNMP polling. We do not currently support any SNMP traps.
VNS3 SNMP support is enabled through the firewall. In the future we will provide API calls and user interface to provide more control of the SNMP experience.
To enable access to the SNMP information add the following rule to firewall using a source address from your network (either your public IP, or an internal IP available to the Controller via IPsec or Clientpack). There is no SNMP authentication in this beta. An example rule would be
INPUT_CUST -p udp -s 69.69.70.70/32 –dport snmp -j ACCEPT
(where 69.69.70.70 is your network’s public IP address).
On your SNMP monitoring system:
You should then be able to use a utility like “snmpwalk” to test:
snmpwalk -v 1 -c vns3public -O e <vns3_manager_public_ip>

Want to see something cool? Let’s add 10,000 firewall rules at once!
If you have trouble with the video player below, watch the video on YouTube: https://youtu.be/N-c3GyGP6qk

This is part 1 of an overview of firewall rules and capabilities with VNS3. Stay tuned for more advanced VNS3 firewall scenarios: Network Address Translation (NAT-ing), Port Forwarding, Netmapping, SNMP Support, and Copying Traffic to a Device.
A Super fast Firewall Overview
Firewall = network security system that monitors and controls the incoming and outgoing network traffic based on a set of security rules.
Firewalls act as a barrier between a trusted, secure network and another network, like the public Internet
2 Types of Firewalls:

IP addresses and firewalls
You can use a firewall to control access to a server or network, or to selectively tailor a client’s response to each request for criteria.
Firewalls examine each packet in TCP/IP traffic. Firewalls determine whether to drop packets or forward packets to the destination. Packets contain 3 key sections: IP header, TCP / UDP header, and data (payload).

NAT Firewalls, IP address translation, and NAT-ing
Network address translator (NAT) can act as an intermediary agent on behalf of clients. The real originating IP address might be masked from the server receiving a request. A common practice is to have a NAT mask a large number of devices in a private network. Only the “outside” interface(s) of the NAT needs to have an Internet-routable address.
Commonly, the NAT device maps TCP / UDP port numbers from public networks to individual private addresses on the masqueraded network. In a typical NAT, only the valid IP address is assigned to the firewall. All other device IP addresses are behind firewall, and their internal IP addresses are only valid on the private network.
Home networks scenario:
NAT functions are usually implemented in a residential gateway device, typically one marketed as a “router”. In this scenario, the computers connected to the router would have private IP addresses and the router would have a public address to communicate on the Internet. This type of router allows several computers to share one public IP address.
When a device on the private network needs to communicate with the outside world, the device sends its request to the firewall. The firewall then places the request on behalf of the device that actually made the request. When the response to the request comes back, the request arrives at the firewall, and then the firewall sends the response to the appropriate computer on the private network.
Firewalls in VNS3
VNS3 acts as an application-layer firewall. It’s a great tool to layer your firewall security on top of lower-level firewalls like AWS Security Groups or Azure Network Security Groups. VNS3 is a layer 4 – 7 firewall for your cloud based application. We like to highlight how it allows you more control over your cloud deployments – Only you can control your VNS3 firewall rules.
Set up that VNS3 Firewall
Once you set up and configure your VNS3 instance, add firewall rules to allow or reject packets.
Navigate to Connections > Firewalls to enter firewall rules. Click Save and Activate.

ta da!
Notes on VNS3 Firewall syntax
VNS3 Firewall features are controlled using IPTables syntax. For more information see http://linux.die.net/man/8/iptables and look for the PARAMETERS section. Another useful guide is available here: http:// www.thegeekstuff.com/2011/06/iptables-rules-examples/
The order of rules matter – rules are applied from top to bottom until the first match. If no match is found, the packet is allowed to continue on.
In addition to the standard security and firewall features of VNS3 you can create your own rules to restrict traffic to and through the VNS3 Controller. Write a specification for a packet to match, then specify what to do with the packet.These are “customer” rules and are applied as appropriate in the overall firewall rule structure on the VNS3 Controller.
If your customer rules don’t reject a packet, it will be allowed by default. However, this “default” is fairly restrictive. Traffic is allowed from “known” VLANS. Known VLANs are VLANS that are listed in IPSec tunnel rules, and the VNS3 virtual VLAN. Allowing traffic from other sources requires adding firewall rules to accept that traffic.
VNS3 Firewall examples: the basics
Drop all packets from 1.1.1.1 to 2.2.2.2:
INPUT_CUST -s 1.1.1.1 -d 2.2.2.2 -j DROP
Drop all traffic from 192.168.3.0/24 (entire subnet) except 192.168.3.11:
INPUT_CUST -s 192.168.3.11/32 -j ACCEPT
INPUT_CUST -s 192.168.3.0/24 -j DROP
Drop tcp traffic from 172.31.1.1 on port 8000 (Stop overlay clients from using the overlay IP of 172.31.1.1 with port 8000).
INPUT_CUST -p tcp -s 172.31.1.1/32 –dport 8000 -m state –state NEW,ESTABLISHED -j DROP
INPUT_CUST -p tcp –sport 8000 -m state –state ESTABLISHED -j DROP

VNS3 Firewall Warning
The VNS3 firewall allows customers complete control of the INPUT, OUTPUT, FORWARDING, PREROUTING and POSTROUTING behavior of traffic as it first enters the VNS3 Controller and as it exits the VNS3 Controller.
The VNS3 internal firewall is still there to “protect” the internal mechanisms of VNS3, however, customer rules can be created that have undesirable effects. Essentially rules that ACCEPT or REJECT/DROP all traffic are likely to create a device that is un-reachable or one that is too permissive in accepting traffic.
Customer rules are evaluated and if there is not a match in the _CUST chains, then they flow through into the interior VNS3 chains which are quite restrictive. Accepting all traffic prevents most of the interior rules from being evaluated which might block unsafe traffic. Blocking all traffic prevents most of the interior rules from being evaluated which accept necessary traffic such as the API and WebUI management utilities. (Blocking port 8000 from all traffic will make the VNS3 instance un-manageable.)
Do not have rules of either of the following forms:
INPUT_CUST –dport 8000 -j REJECT
INPUT_CUST -j REJECT
INPUT_CUST -j ACCEPT
Up next, we’ll look at more advanced VNS3 firewall scenarios including: Network Address Translation (NAT-ing), Port Forwarding, Netmapping, SNMP Support, and Copying Traffic to a Device.
Recent Comments