IPv6, Secure and Private AI are both upon us, and Cohesive Networks is delivering into those areas with the same practical approach we have used for Public and Private Cloud all these years.
Moving to IPv6 – herein lies madness (Part 1)
read more

VNS3 6.0 Beta3 will be available in cloud marketplaces or upon request this week (contactme@www.cohesive.net). In our last post we showed how easy it is to connect your native WireGuard® clients to VNS3 6.0. In this post we show you how to use the Cohesive VPN Client to achieve the same goals like connecting to data centers or cloud VPCs/VNETs, and managing your own WireGuard® network connecting multiple people and devices. In addition, we will show an overview of using our enterprise capabilities like dynamic route updates, easy tunneling of all traffic with local subnet exceptions, and OIDC integration so you can authenticate your vpn users with Google Authentication, Okta, Auth0 and more.
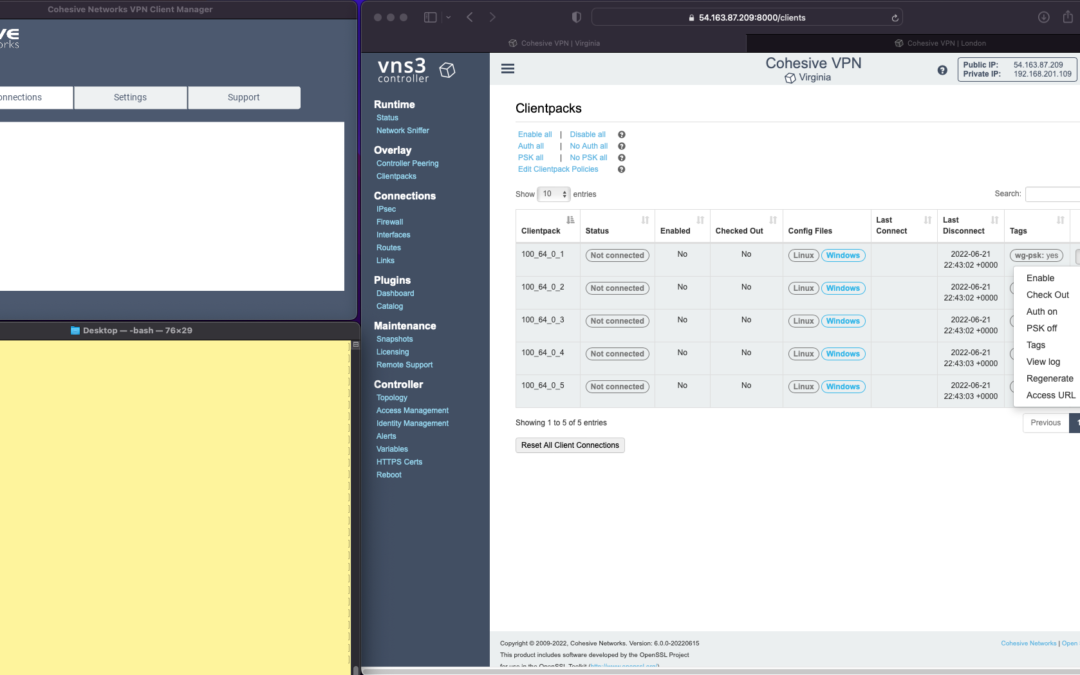
The screen shots throughout show three windows; upper left the Cohesive VPN client, bottom left a command line from the same Mac, and to the right the cloud-based VNS3 server.
VNS3 Network Platform has the concept of “clientpacks” – basically the credentials needed to connect a machine or a person to the network via a VPN client. Historically “clientpacks” have been “openvpn” by default. Starting in 6.0 clientpacks are WireGuard by default. In a future release we will support a dual stack with both “ovpn” and “wg” connections simultaneously, and a goal of IPsec clients as well.
In the picture above and those below we show the “Clientpacks” page. From this you can perform key administrative functions like disabling addresses, re-generating credentials, updating pre-shared keys, and getting access URLs for secure and easy distribution of VPN credentials.


Above shows the results of choosing “Access URL” and displaying its result. This is a secure, one-time, timed URL allowing users to copy/paste the clientpack, download it for import, or use via a QR code on mobile devices.
It has all the necessary information to make a connection using the Cohesive VPN Client – with or without PSKs.
The commented lines are used by CNVPN CLI and GUI for additional enterprise support; failover, dynamic route updates, and OIDC authentication.
Copy/paste the clientpack into the Cohesive client via the “Paste” option, and choose Save.


Next choose “Connect” from the Cohesive Client’s “Actions” menu – and the VPN connection is created. The VNS3 Clientpacks page then shows the status as “connected”.
Below shows access to the VPN network by successfully pinging the VNS3 controller’s VPN address. (By default, this connection can access other addresses on the VPN. If that’s not desired it is easily changed via the Firewall page.)


You can use the Action menu on the VNS3 Clientpacks page to perform administrative operations. For example, if you select “Disable” on the connection, the client is dropped from the VPN.
Similar operations can be performed to re-new or re-secure a connection by adding a PSK or re-generating keys (both of which require the clientpack to be redistributed to the user or device). As expected, when you enable a PSK for the connection, the user is unable to access the network. With the credential re-deployed with the appropriate clientpack containing the PSK, they are back on the net!
To see some of those operations in action, take a look at our previous post. Cohesive’s target is to provide organizations the ability to deploy their own enterprise VPN infrastructure. This could be managed by Cohesive via our SecurePass offering, or self-managed. Regardless, our initial focus for 6.0 is managed, enterprise WireGuard.
One of our key enterprise features is dynamic route updates. For “people vpns” you can usually just tunnel all traffic through the VPN – making the VPN adapter the default gateway. However, for IoT and machine2machine vpns, dynamic routing is a critical capability. You allow the device to have its own local gateway but when routes arrive dynamically, the traffic begins to follow that path. If the route is removed from the network, the default gateway is used.
In the example below the configuration is changed to have “RoutePolling = True”, and on the VNS3 controller a route to 55.55.55.55 has been advertised through the VPN. In the terminal window route display there is not yet a specific route to that public IP.
Once re-connected, the route to 55.55.55.55 through the VPN is visible on the client as a result of the dynamic route updating.
If that route is disabled or removed from the VPN network, then it is removed from the client.


Tunneling all traffic through the VPN to the Internet is a snap with the Cohesive VPN Client.
Set the client parameter “TunnelAllTraffic” to “True” AND make sure you have enabled firewall directives on the VNS3 Server to send all VPN traffic out to the Internet.
VNS3 Free edition comes with a default set of rules in a group called “VPN2Internet. Go to the Groups view on the Firewall page and enable these rules.
This will direct all traffic from your VPN client to the Internet, getting its address translated to the Public IP of the VNS3 controller.
What if you still want to be able to access local network resources like a printer or file server? In that case, use the “LocalRoutes” option to enter a comma delimited list of the network CIDRs you want to exempt from the VPN so they can be reached locally.
Now that all traffic is being tunneled, from the command line the public IP 8.8.8.8 can be successfully pinged. To “prove” this traffic is going into the VPN we show it via our Network Sniffer.


So far the examples have just used WireGuard protocol with unique keys and pre-shared key (PSK) for the connections. What about more specific user authentication? For WireGuard in VNS3 6.0 we use OIDC (Open ID Connect), and will add LDAP support in future. (Our dual stack offering in future will allow simultaneous use of OpenVPN and WireGuard clients, with your choice of LDAP/AD or OIDC).
With OIDC support you create a VPN users and/or admins application in your OIDC provider and then configure VNS3 integration.

Once the OIDC configuration has been saved you can login. In this case we are using our Google Apps login. When “Connect” is chosen, a login screen pops up in the default browser.

Upon entering the correct password the login panel indicates success and the VPN client connects!

Next up we will show using the Cohesive CNVPN CLI on a Linux machine. For cloud overlay networks and over-the-top cloud networking, the CLI is a powerful way to bring your enterprise feature set to your cloud and multi-cloud deployments.
(“WireGuard” and the “WireGuard” logo are registered trademarks of Jason A. Donenfeld.)

VNS3 6.0 Beta2 is now available.
You can find the Free edition in both the Amazon and Azure marketplaces (GCP coming soon).
It is an easy way to get a server up and running that can connect you to data centers, cloud VPCs/VNETs, has a super firewall, straightforward support of even difficult things like “source based routing”, and most of all a quick way to run and manage your own WireGuard® network connecting multiple people, devices, or both.
This post will show you how to use the standard Mac Appstore WireGuard client built and delivered by the WireGuard team with Cohesive Networks VNS3 6.0 network controllers. (Of course similar capability is available using the same app from the Windows/iPhone/Android “app stores” as well.)
In future posts we will show the Cohesive CLI (cnvpn) at work, and the Cohesive WG GUI working with VNS3 6.0. And then we will follow up by showing how the different connection options work with a distributed VPN cluster where you can spread a VNS3 controller mesh across regions and clouds with ease, yet have a unified VPN system for management of credentials, pre-shared keys, OIDC sessions and more.
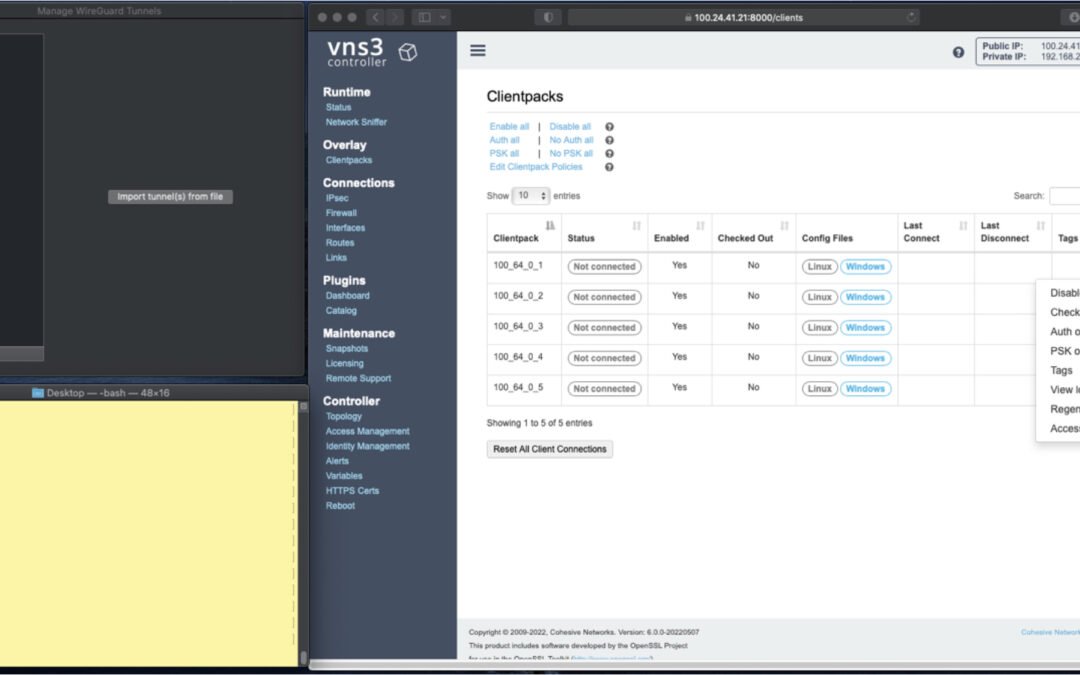
In the screen shots throughout we have three windows; upper left the Mac OS WG client, bottom left a command line from the same Mac, and to the right the cloud-based VNS3 server supporting a wide range of cloud networking use-cases, and here specifically WireGuard VPN connections.
VNS3 Network Platform has the concept of “clientpacks” – basically the credentials needed to connect a machine or a person via a VPN client to the network. Historically they have been “openvpn” by default – and starting in 6.0 they are WireGuard by default. In a future release we will support a dual stack with both “ovpn” and “wg” connections simultaneously, and a goal of IPsec clients as well.
In the picture above and those below we see the “Clientpacks” page. From here you can perform key administrative functions like disabling addresses, re-generating credentials, updating pre-shared keys, and getting access URLs for secure and easy distribution of VPN credentials.

Above shows the results of choosing “Access URL” and displaying its result. This is a secure, one-time, timed URL which allows users to copy/paste the clientpack, download it for import, or for mobile clients use a QR code for import.
It has all the necessary information to make a connection using the standard WG Client – with or without PSKs.
There is also a series of commented lines which are used by CNVPN CLI and GUI for additional enterprise support (failover, dynamic route updates, OIDC authentication) to be discussed in future. For now we just want to focus on how easy it is to connect native WG clients.
Copy/paste the clientpack into the Mac OS client, and click SAVE/ACTIVATE.

Voilà – you are connected to the VPN. The VNS3 Clientpacks page shows the status as “connected”.
The WG Client now shows its statistics about the connection, and below we are pinging the VNS3 controller’s VPN address to show access to the VPN network.
(By default, this connection can access other addresses on the VPN. If that’s not desired it is easily changed via the Firewall page.)

If needed you can use the Action menu to perform administrative operations. For example, if you select “Disable” on the connection, the client is dropped from the VPN. Below, we see the client set to disabled state by the Admin, and we see the “pings” begin to fail.
Then we “Enable” – and the client is back on the network and packets begin to flow.


And of course similar operations can be performed to re-new or re-secure a connection by adding a PSK or re-generating keys – both of which require the clientpack to be redistributed to the user or device. But as expected, when you enable a PSK for the connection, the user is unable to access the network. With the credential re-deployed with the appropriate clientpack containing the PSK, they are back on the net!


Accessing the other devices on the VPN network is one use, what about getting to the Internet?
This requires a couple configuration elements on the client side which requires a little bit of operating system knowledge on the client side and a of couple firewall rules on the VNS3 Controller. We won’t go into those specifics here.
But, if you look at the Cohesive-specific directives used by the CNVPN CLI and GUI – one of them is “TunnelAllTraffic” – and when this is set to “true” – all the client side magic is done for you! But that is for another day.
(“WireGuard” and the “WireGuard” logo are registered trademarks of Jason A. Donenfeld.)

As cloud adoption continues to ramp up in 2022, with Gartner projecting another 21.7% growth in cloud spend this year, companies are maturing beyond their initial workload migrations to single cloud vendors. Whether to create resiliency due to the now not so uncommon major outages we have seen in the past few years, to tailor their many application environments to changing business requirements, or to migrate to new cloud vendors whose offering is the best fit. However, in order to realize these opportunities, companies need a consistent network layer that is uncoupled from any one cloud vendors specific dependancies. No matter which cloud you choose, achieving this goal requires utilizing third party network solutions. Such a solution should ideally facilitate connectivity to data-centers, remote users, and IOT devices as well.

Cohesive Networks VNS3 cloud edge security controllers can create the backbone across all of your public cloud vendors in an easy to manage and secure mesh, with LNKe connecting all of your virtual private networks. This gives you a fully transitive network across all of your cloud real estate, running at performative speeds with built in failover and self healing mesh capabilities. Granular IPSec cloud edge configurations allow you to connect corporate data centers, partner networks and vendor access, regardless of their hardware. Policy enforcement is consistent across the network and has been simplified for ease of management. With our comprehensive firewall you can easily define people, groups and network objects to allow your remote workforce to securely connect at the edge closest to their physical location. In short, with VNS3 and LNKe, you can create a full network mesh consistent with your needs that can grow to anywhere that you need to be and scale with your deploments.
Please reach out to the Cohesive Networks sales and solutions team at contactme@www.cohesive.net to further the discussion with any interests that you may have. We are always happy to help.

Cohesive Networks has been helping our customers build robust transit networks on public cloud infrastructure since our early days. Doing so on VNS3 technology gives you secure and observable methods consistent across cloud providers and other virtualization platforms. Up until recently we achieved this by creating site to site IPSec tunnels into our federated mesh backbone. This approach, while robust due to BGP failover capabilities, adds quite a lot of complexity. Each of these connections have unique peering addresses and autonomous system numbers (ASN), as well as peer access lists to configure and manage. Which brings us to our new offering, the VNS3 LNKe controller. LNKe controllers are simple to set up while still providing robust failover capabilities.
The VNS3 LNKe controller is one of Cohesive Networks latest offerings. It’s been designed to provide a low cost, easy to deploy, method of connecting your private cloud networks, regardless of the provider. Let’s take a look at the mechanics of it.
VNS3 can be deployed in a peered mesh topology, where by all of the members of the mesh exchange connection and routing information with all of the other members of the mesh across encrypted peering links. These mesh peers can be situated in any cloud provider and in any region. This is the hub in your typical hub and spoke model. The difference being that VNS3 hub, or mesh, components can exist in many different locations, while still being aware of all of the other components. Extending the hub
simply entails adding new peers. This hub can be as little as one or two VNS3 controllers to many tens of controllers spanning across your cloud vendors regions. Within this mesh you have full visibility and attestability of network flows.

Now to connect your various networks into the mesh so as to facilitate your transitive network. LNKe is a light weight variant, thats has been designed to work with the encrypted overlay networking capabilities of VNS3. It uses the cryptographic key architecture to create a tunnel from the LNKe controller to the closest mesh controller. This link can be established through a VPC peering link between the connecting VPC or over public IP. You simply have to deploy the LNKe controller into the connecting VPC and push the VNS3 client pack to it. This gives it a unique overlay address that the hub mesh is aware of.

The LNKe can be configured to have failover hub members that it will connect to should any failure occur. On the hub members that it is configured to connect to we then create route entries for the LNKe’s network. This route is pointed at the overlay IP that has been associated with the LNKe controller. While these are effectively static entries, VNS3 will only ever enable the one that is actively connected to. We call this dynamic static routing.

On the connected VPC you can set your subnet route of 0.0.0.0/0 to point to the LNKe controller, since LNKe can also serve duty as your NAT gateway. In this way any traffic that is bound for other connected networks will traverse into the hub, where as non transit network traffic can get out as needed.
This solution gives you a lot of flexibility in managing your network connections. You have full firewall capabilities to restrict and shape traffic. You can transform traffic should you have overlapping CIDRs. You can combine other connections into the mesh such as remote workforces or data center connectivity. You can inject network function virtualization like NIDS and WAF. You end up with a network control plane that works the same across all cloud providers that is cost effective and easy to deploy and mange.

We are happy to announce that VNS3 version 5.2.1 has been released and is available for deployment in all cloud platforms. Below are some of feature highlights of this release.
AWS Private AMI: users with private AMI access to UL versions will see the 5.2.1 AMI already shared into their account. Filter for Private Images in the appropriate region and search for vnscubed521-20211111-ul-ebs-5LFW.
AWS and Azure Marketplace: all VNS3 Marketplace SKUs are updated with the latest 5.2.1 listings.
GCP and OCI: contact support@www.cohesive.net for image access.
This release focuses on making our Distributed Cloud (site-to-site VPN and Overlay Mesh) and Plugin user experience easier from implementation to operation. Don’t forget, release notes are always available at https://docs.cohesive.net/docs/vns3/release-notes/.
Over the last few years the world of site-to-site VPN has been moving away from Policy-based IPsec VPN in favor of Route-based. Route-based VPNs, from the POV of the device, have simpler configurations (generally a single tunnel) and as a result can have increased long term stability. Simple and stable is good but Route-based VPNs without associated policies/ACLs can be thought of as ‘IPsec without the sec’ and let any traffic move between the two sites. Traffic pairs simplify the deployment of secure route-based VPNs.

This new feature allows local/remote subnet pairs to be defined via UI or API for a route-based VPN. This is very similar to how policy-based “tunnels” are defined. When using traffic pairs, VNS3 manages the default state of routes and ACLs for those pairs. Additional routing and ACL operations are not needed when using traffic pairs. “Traditional” configuration is still supported as originally presented since VNS3 4.4.1. This new approach makes it easier for customers integrating VNS3 into their infrastructure to leave the state management of routes and ACLs to VNS3, rather than incorporating related state into their database.
Many of you have leveraged the VNS3 Plugin System (Container System) to add critical network services in-path to allow full customization of your network edge. Previously container images had to be sourced in from outside storage buckets or uploaded from local storage. VNS3 now provides in-place installation of plugins via Plugin Catalog. The updated VNS3 Main Menu now lists “Plugins” –> “Catalog” which allows access to a number of additional monitoring, logging, and security functions provided via plugins. The catalog allows in-place installation inside the VNS3 UI – as opposed to requiring access via the Cohesive Website. To see all our available plugins, please visit the plugins page on our support site.

Additionally the plugin Dashboard is available to provide simplified management of plugins.

You also note that we’ve replaced the “Container” menu items with “Plugins” but don’t worry you can still access the Container submenu items via the Dashboard.On the right hand side of display there is a “Developer” menu which provide access to the lower level “Container”, “Images” and “Network” functions for the plugin system.
We’ve seen Distributed Cloud deployments and use cases increase dramatically over the last few years. As a result the need for speed has become increasingly important in both intra-region as well as inter-cloud deployments. In response we’ve workd to dramatically increased the speed of the peering mesh for new deployments. Behind the scenes Cohesive has been building Wireguard tunneling capabilities into VNS3 since late 4.x releases. We are pleased to now offer this to our BYOL customers deploying new topologies. The Wireguard-based mesh can achieve peering throughput very close to the underlying virtual instance NICs. (Hats off to Jason Donenfeld and the WireGuard team for an amazing system.). Contact Cohesive support (support@www.cohesive.net) for a license which enables this feature BEFORE any deployment configuration.
Any user regardless of subscription SKU or support contract is eligible for upgrade assistance including live upgrade chaperoning by a member of our excellent support team. To schedule your assisted upgrade, open a ticket on our support system (support@www.cohesive.net) and we’ll ensure a smooth transition.
NOTE: Peering between major versions (e.g. 4.x peered with 5x) can be done but we don’t recommend due to potential stability issues.
Please don’t hesitate to reach out with any comments, questions, or feature requests (contactme@www.cohesive.net).

Internet Protocol Security (IPSec) is used to encrypt communications between two computers over the internet. Usually it is done between between security gateways to allow two networks to communicate securely. On the data center side this will be done for the most part on physical boxes manufactured by the likes of Cisco, Juniper, Fortinet and others. In the public cloud it is virtualized. Cohesive Networks VNS3 is one such device that allows you to easily configure these secure connections into your cloud private network. Whether you are running a hybrid cloud, are an ISV that needs to connect to customer sites or are implementing a multi cloud strategy VNS3 can provide a stable, secure and simple solution.
VNS3 can manage as many IPSec connections as you need, the only limit is the underlying instance resources. You can scale your VNS3 instance with the number of connections. It supports both policy and route based connections and supports a wide range of algorithms, hashes and Diffie-Hellman groups. In short, VNS3 can connect to just about anything out there. It’s highly configurable design lets you match exactly what it is communicating with. This all makes VNS3 a very stable solution.
Setting up VNS3 is a breeze. You can launch it out of your cloud vendor’s marketplace and pay by the hour, or contact Cohesive Networks for longer term billing. VNS3 should be placed into a public subnet. Once launched you will need to either in AWS, turn off source destination checking, or in Azure, enable IP Forwarding on its network interface. In AWS you should attach an Elastic IP (EIP) to it or in Azure a Public IP Address. Once it is up you can manage it via its web interface. You will need to open up TCP port 8000 in your security group. Then open a browser and go to:
https://
The default admin username is: vnscubed
In AWS the default password is the instance id, in Azure the default password will be the virtual machine name followed by a hyphen then the private ip (ex. MyVNS3-10.0.0.1)
Once you have logged in you should change the admin and api passwords.
The IPSec configuration page can be found under the Connections section on the left hand side contextual menu. From there you will want to click on the “New Endpoint” button and will see the IPSec configuration form.

Now it is just a matter of filling in the parameters for the endpoint you will communicate with. Typically you and the other party will agree upon a set of algorithms, hashes and dh groups as well as NAT-T or native IPSec and IKEv1 or IKEV2. While VNS3 does a good job of auto discovery it is best to make sure that both sides are explicitly the same. We provide a simple syntax for VNS3. An example might look like:
phase1=aes256-sha2_256-dh14
phase2=aes256-sha2_256
pfsgroup=dh14
phase1-lifetime=3600s
phase2-lifetime=28800s
dpdaction=restart
dpddelay=30s
dpdtimeout=90s
VNS3 simplifies this process by putting all of your configuration on a single page.
If you are creating a policy based IPSec connection you will next need to create individual tunnels for your connection. This is done after the creation of the initial endpoint. After the endpoint is created you can create a “New tunnel” from the action drop down to the right of your endpoint. This will be your local subnet and then the subnet on the other side of the connection that you will be communicating with.

With route based IPSec we support both Virtual Tunnel Interface (VTI) and over GRE, useful for sending multicast packets. If you are utilizing a VTI route based IPSec VPN you next want to set up a “New eBGP Peer” from the action drop down.

Your IPSec configuration should now show as connected.
In the next parts in this blog series we will dive into the tools we provide to troubleshoot a faulty connection, interesting things you can do with our firewall to transform the tunnel traffic, and some plugins we use to solve common problems.
Recent Comments